
Loading . . .
Loading . . .


On-Field DPS
Pyro • Bow
Yoimiya excels as a single target Main Pyro DPS thanks to her incredibly powerful Normal Attacks, but is flexible enough to run optimally in most reaction teams.
Main Stat: CRIT Rate
Suggested Energy Recharge: 150%


Normal Attack
Performs up to 5 consecutive shots with a bow.
Charged Attack
Performs a more precise Aimed Shot with increased DMG.
While aiming, flames will accumulate on the arrowhead before being fired off as an attack. Has different effects based on how long the energy has been charged:
- Charge Level 1: Fires off a flaming arrow that deals Pyro DMG.
- Charge Level 2: Generates a maximum of 3 Kindling Arrows based on time spent charging, releasing them as part of this Aimed Shot. Kindling Arrows will home in on nearby opponents, dealing Pyro DMG on hit.

Plunging Attack
Fires off a shower of arrows in mid-air before falling and striking the ground, dealing AoE DMG upon impact.

"Niwabi" is a form of incense firework created by Yoimiya herself. Its ability to be lit without any prior training or preparation has made it a real hit. After many fire-related incidents, the Tenryou Commission ordered the use of "Niwabi" banned, but small, bright sparks can often still be seen springing up at night. If seen from above, they look almost like little twinkling stars.
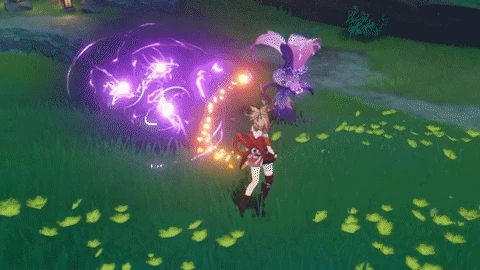
Niwabi Enshou
Yoimiya waves a sparkler and causes a ring of saltpeter to surround her.
During this time, arrows fired by Yoimiya's Normal Attack will be Blazing Arrows, and their DMG will be increased and converted to Pyro DMG. During this time, Normal Attack: Firework Flare-Up will not generate Kindling Arrows at Charge Level 2.
This effect will deactivate when Yoimiya leaves the field.


Fireworks are man-made starlight, comets fired into the sky. Though they last for but an instant, the memory of their brilliance shall surely live on.
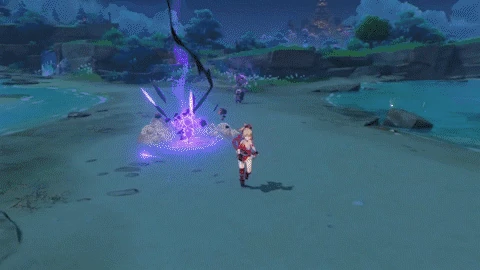
Aurous Blaze
Yoimiya leaps into the air along with her original creation, the "Ryuukin Saxifrage," and fires forth blazing rockets bursting with surprises that deal AoE Pyro DMG and mark one of the hit opponents with Aurous Blaze.
All Normal/Charged/Plunging Attacks, Elemental Skills, and Elemental Bursts by any party member other than Yoimiya that hit an opponent marked by Aurous Blaze will trigger an explosion, dealing AoE Pyro DMG. When an opponent affected by Aurous Blaze is defeated before its duration expires, the effect will pass on to another nearby opponent, who will inherit the remaining duration.
One Aurous Blaze explosion can be triggered every 2s. When Yoimiya is down, Aurous Blaze effects created through her skills will be deactivated.
>
>


Pyro Hypostasis

x1

x9

x9

x6

x46
Smoldering Pearl

x168
Naku Weed
x18

x30
x36
Divining Scroll
Sealed Scroll
Forbidden Cursed Scroll
Azhdaha

x18
Dragon Lord's Crown

x9

x63

x114
Transience
(Mon/Thu/Sun)
x18
x66
x93
Divining Scroll
Sealed Scroll
Forbidden Cursed Scroll

x3
Crown of Insights
5
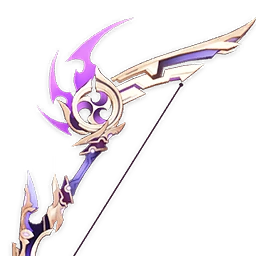
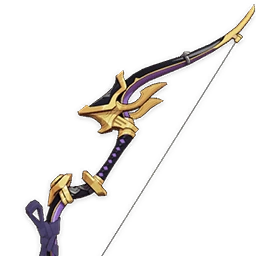
- Thundering Pulse -
Base ATK: 46 - 608
CRIT DMG: 14.4% - 66.2%
Increases ATK by 20/25/30/35/40% and grants the might of the Thunder Emblem. At stack levels 1/2/3, the Thunder Emblem increases Normal Attack DMG by 12/24/40%. The character will obtain 1 stack of Thunder Emblem in each of the following scenarios: Normal Attack deals DMG (stack lasts 5s), casting Elemental Skill (stack lasts 10s); Energy is less than 100% (stack disappears when Energy is full). Each stack's duration is calculated independently.

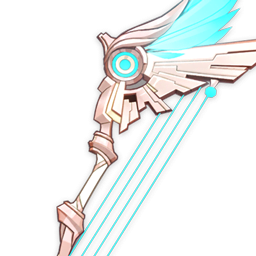
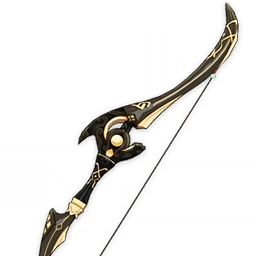
4
- Rust -
Base ATK: 42 - 510
ATK: 9% - 41.3%
Increases Normal Attack DMG by 40/50/60/70/80% but decreases Aimed Shot DMG by 8/9/10/11/12%

Aqua Simulacra: This weapon requires Yoimiya to be very close to enemies (~8m). As such, this weapon is recommended only with a good shielder.
Skyward Harp: This weapon provides good amount of CRIT Rate, making it easy to achieve good CRIT Ratio. As such, this weapon is a good generalist for any kind of bow dps.
Rust: At higher refinements, this weapon can outperform a low refined Amos' Bow and Skyward Harp.
Hamayumi: If you're using Shimenawa's Reminiscence (4P), this weapon doesn't synergize well with that artifact set due to its passive.
Prototype Crescent: Note that you want to proc the weapon passive by doing a quick charged shot on the enemy's weakspot for this weapon to be good.

Slingshot: With a large amount of external ATK buffs, this weapon is competitive to R1 Rust. Note that you have to be in range for Slingshot's passive and have good uptime on the ATK buffs.

- Shimenawa Reminiscence -
2 Set Bonus:
ATK +18%.
4 Set Bonus:
When casting an Elemental Skill, if the character has 15 or more Energy, they lose 15 Energy and Normal/Charged/Plunging Attack DMG is increased by 50% for 10s. This effect will not trigger again during that duration.
Offers more personal damage on Yoimiya but it sacrifices her Elemental Burst uptime which translates to lower overall team DPS due to not being able to fully benefit from her Ascension 4 passive.

- Crimson Witch of Flames -
2 Set Bonus:
Pyro DMG Bonus +15%
4 Set Bonus:
Increases Overloaded and Burning DMG by 40%. Increases Vaporize and Melt DMG by 15%. Using Elemental Skill increases the 2-Piece Set Bonus by 50% of its starting value for 10s. Max 3 stacks.
The go-to artifact set for Vaporize focused Pyro carries, excels over the other options especially on a reaction focused team comp.

Echoes of an Offering
The Echoes of An Offering will increase your characters' Normal Attack DMG based on the user's ATK. This artifact set might be good on characters who primarily use Normal Attacks like Ayato, Yoimiya, Tartaglia, or Razor.

Lavawalker
Good option on a Mono-Pyro team comp where Yoimiya can have 100% uptime on the artifact passive.

Retracing Bolide
Yoimiya generally doesn't want to be interrupted when doing the Normal Attack strings, the 3rd and 5th hit deals the most damage. As so, it is typically good to have a shielder with Yoimiya.
This set can take utilize that playstyle by increasing the shield-strengh while also having the NA and CA DMG increased while being protected by a shield.
2 Set Crimson (Pyro DMG Bonus + 15%) + 2 Set Gladiator/Shimenawa (ATK+18%)
he best generalist set on Yoimiya as it is competitive with the other options for personal damage and works in every situation.
This weapon requires Yoimiya to be very close to enemies (~8m). As such, this weapon is recommended only with a good shielder.
Sands
ATK% / Elemental Mastery
Goblet
Pyro DMG Bonus
Circlet
Crit Rate / DMG
Yoimiya
Fischl
Beidou
Bennett
Yoimiya
Thoma
Bennett
Sucrose
Yoimiya
Yun Jin
Bennett
Kazuha
Yoimiya
Yelan
Yun Jin
Zhongli
Yoimiya
Xingqiu
Bennett
Zhongli
Yoimiya
Fischl
Xingqiu
Sucrose

Yunjin
Yun Jin provides a huge amount of Normal ATK Bonus and Normal ATK SPD Bonus(C6) to Yoimiya.

Xingqiu
Xingqiu’s Elemental Burst can attach Hydro element to enemies continuously, and so react with Yoimiya’s Pyro DMG to trigger Vaporize. Xinqiu's Elelemental Skill also provides Interruption Resistance making it somewhat viable to run Yoimiya without a shielder.

Yelan
Yelan is the Sub DPS in this team. Yelan can also provide continuous Hydro attack off-field which reacts with the Pyro element on enemies applied by Yoimiya. Yelan’s Elemental Burst can also increase DMG of Yoimiya via her passive talent.

Zhongli
Zhongli’s shield provides safe environment for Yoimiya to complete her attack strings, and increase ATK of whole team by using full set of Tenacity of the Millelith. On top of that, Zhongli's shield can also shred the resistance of enemies and provides Geo Resonance when Yun Jin is on the team.

Noelle
Noelle’s shield also provides safe environment for Yoimiya to complete her attack strings, but won't be able to utilize the full set of Tenacity of the Millelith.
In exchange, Noelle can provide healing for all party members. Increasing the survivability of the whole team.

Fischl
Fischl’s Elemental Skill can provide continuous Electro aura Off-field, which works with Yoimiya to trigger overload. C6 of Fischl will have a significant upgrade of the team.

Raiden Shogun
Raiden Shogun’s Elemental Skill can provide also continuous Electro application, which works with Yoimiya to trigger overload.

Yae Miko
Yae’s Elemental Skill provide continuous Electro attachment off-field. When C4, it provides Electro DMG buff to teammates.

Bennett
Bennett’s Elemental Burst provides huge ATK buff and healing to other members, enables Pyro Resonance when ran with yoimiya. He can also utilize the Noblesse Oblige set to provides even more buff. Yoimiya can take advantage of Bennett's C6, which gives her Pyro DMG while staying on the field created by his Elemental Burst. While it is generally not recommended to activate C6 because it will ruin his synergy with a Physical Main DPS, Activating the C6 is fine for Pyro Main DPS like Yoimiya.

Kazuha
Kazuha can assist the team by grouping enemies together, applying crowd control which is not too useful considering Yoimiya is primary a single target DPS. Kazuha also provide DMG buff to teammates and utilize the Viridescent Venerer Set to reduce Elemental Resistance of enemies.

Sucrose
Sucrose can apply crowd control. In addition to that, She gives out a lot of Elemental Mastery to teammates, making her a better option on a Reaction-Focused team. She can also utilize the Viridescent Venerer Set to reduce Elemental Resistance of enemies.

Beidou
Beidou’s Elemental Burst can provide continuous Electro aura Off-field, which works with Yoimiya to trigger overload. Her Elemental Burst also provides shielding and resistance to interruption.

Kamisato Ayato
The Elemental Burst of Ayato can increase Attack SPD of Yoimiya as well as providing tons of Off-Field Hydro Application.

Sangonomiya Kokomi
Kokomi can also provides tons of Off-Field Hydro Application while also keeping the team alive with a large amount of healing.

Ganyu
Ganyu’s Elemental Burst deals high DMG and provides Cryo aurao for triggering Melting Off-Field. Also she can be on field when Yoimiya’s Elemental Skill is in CD.

Diona
Diona’s shield provides safe environment for team members and also is a battery of Ganyu’s Elemental Burst.

Thoma
Thoma’s shield provides safe environment for team members, and increase ATK of whole team by pairing up with Yoimiya through Pyro Resonance.